3 Configuring the Exam tool
Accessing the Exam tool before it has been configured will automatically take you to the configuration pages. Alternatively, you can return to the Configuration from the Exam tool by selecting Configuration from the navigation panel in the left.
3.1 Basic Configuration
Most exams require only basic configuration of the Exam tool. This section will walk through creating and setting up a simple exam tool, there are three main stages:
- 3.1.1 Creating sections
- 3.1.2 Configurating questions
- 3.1.3 Adjusting view and reporting options
3.1.1 Creating sections
To create sections:
- enter the number of sections
- select the Next button
Notes: A ‘section’ in MMS is defined as a group of questions with the same number of marks. This is particularly useful in situations where students need to complete x of y questions. If every question has a different mark then a separate section for each question should be created. This setup may not exactly match the sections in the exam paper, but the sections in MMS can be renamed later (including having the same name) to more closely match the exam paper.
3.1.2 Configuring Questions
To add questions:
- For each section:
- using the field in the Questions column enter the number of questions in the section
- using the field in the Required answers column, enter the number of questions the student is required to complete
- using the Marks per Question column, enter the number of marks each question will be marked out of
- Select the Finish button to save.
1.1.3 View options and reporting
Under the main exam section and question table there are other configuration options. To complete the standard Exam configuration:
- Select the required view and reporting options from the drop down lists
- Select the Save Exam Paper Configuration button to save.
The View and reporting options are:
Student Identification: This defines how the students will be displayed on the page:
- Show only student IDs - this option should be used for anonymous marking and will display students by their matriculation number. This is the default.
- Show student names and student ID’s – this option will display the student names and usernames in addition to the matriculation number
Single/double marking: This defines the type of marking used in the tool. The options are:
- Marks are entered once, last mark entered is used – for single marking. Multiple users can enter marks but only the last entered mark will be used. This is the default.
- Two sets of marks; must agree with each other – for double marking. Two markers can enter marks independently and MMS will flag when marks do not agree.
Reporting: This defines how many marks the Exam tool will pass to the Final Grade tool. The options are:
- A single grade – The exam tool will calculate a final exam grade and then pass this to the Final Grade tool. This is the default.
- Each section produces a grade, all with the same map – The exam tool will calculate the mark produced by each section separately based on the selected mark/grade map, and pass these individual marks to the Final Grade tool in addition to the final exam mark. Each section produces a grade, via own map – New options will appear on the Mark-Grade Map tab to allow a different mark/grade map to be selected for each section. The exam tool will calculate the mark produced by each section separately based on the selected mark/grade map, and pass these individual marks to the Final Grade tool in addition to the final exam mark.
‘If grades have not been entered for all work a student is expected to complete’: This defines how the exam tool handles the situation where not all the required questions have had marks entered. The options are:
- Treat missing grades as 0 for reporting – where marks have not been entered for a question, MMS will calculate a final exam mark assuming the student received a 0. This is the default.
- Do not report a grade to final grade tool – if not all the required questions have been answered, MMS will not pass an exam mark for that student to the Final grade tool.
This is usually the last step for most simply structured exams. The Additional configuration options section describes other optional configuration options.
3.2 Additional Configuration Options
In addition to the basic configuration options the Exam tool can be configured to handle more complex cases.
3.2.1 Scale Factors
Scale factors control how much a section influences the overall exam mark. In most cases the scale factor can be left as 1 a mark for one question normally has the same weight as a mark in another question – however scale factions can be adjusted using the field in the Scale Factor column and selecting the Save Exam Paper Configuration button at the bottom the page. This works by multiplying the number of marks the student received for a question by the scale factor.
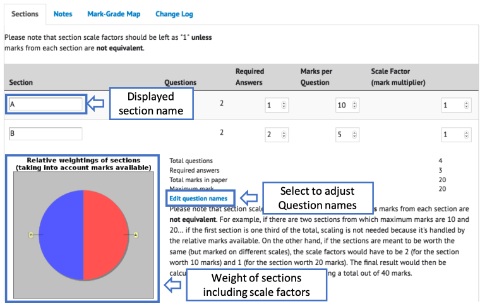
The Relative weightings of sections chart (as indicated in Figure 2) will display the weighting of each section after scale factors have been applied.

Figure 2: Exam Configuration page with labels indicating where to adjust section and question display names and highlighting the Relative Weightings chart.
3.2.2 Renaming sections and Questions
As the breakdown of the sections in the Exam tool may not match the breakdown of sections in the Exam paper, to make it clearer for markers (and for students if pairing the Exam tool with the Online Exam tool), the sections and questions can be renamed. Different sections can be renamed the same name.
To rename a section:
- On the Configuration page use the Use the field in the Section column to enter the new section name.
- Scroll down and select the Save Exam Paper Configuration button.
To rename questions:
- On the Exam Configuration page select the Edit question names link (see Figure 2).
- Using the fields next to the question numbers, enter the new display names.
- Select the Update Question button to save.
3.2.3 Notes columns
In addition to the standard numerical columns, it is possible to create Notes columns for entering text comments into the exam tool.
To create a new notes column:
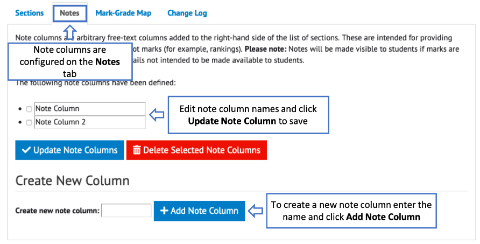
- On the Exam Configuration page select the Notes tab (see Figure 3).
- Scroll down to the Create New Column section
- Enter the column name in the Create new note column field
- Select the Add Note Column button
To edit the display name of existing notes columns:
- On the Setup Exam page select the Notes tab (see Figure 3).
- Locate the note column you wish to edit
- Edit the display name in the field provided
- Select the Update Note Columns button to save
To delete an existing notes column:
- On the Setup Exam page select the Notes tab (see Figure 3).
- Locate the note column you wish to delete
- Select the note column using the checkbox to the right of the column name
- Select the Delete Selected Note Columns button to delete.

Figure 3: The Notes tab on the Setup Exam page allows creation and configuration of Note Columns
3.2.4 Mark-Grade Maps
Mark/Grade maps are used by MMS to turn marks into grades. MMS will calculate the percentage of marks the student has attained, and then locates this percentage position on the Mark-Grade map to determine the grade. If the student has achieved a percentage that is not explicitly defined on map, MMS will extrapolate based on the entered points and the interpolation between the points.
The default mark/grade map has two points: 0:0 and 100:20 with a linter interpolation between them therefore a student who got 0% will get a grade of 0, 50% will get a grade of 10 and 100% will get a grade of 20. However, often more complex mapping is required.
To create a new Mark/Grade model:
- On the Setup Exam page select the Mark-Grade Map tab.
- Enter the map point percentages into the Percentage(%) column (do not include the % sign)
- Enter the corresponding grades into the Grade column
- Select the interpolation from the drop down list under the map
- Select the Save Mark Map button to save the current map points.
- Scroll down to the Save this grade map as a model text box
- Enter a name for the model.
- Select the Save Model button.
- The new model will now appear in the ‘Replace Mark Map’ section on all exam tools in the school.
If all the points in the map are filled, clicking the Save Mark Map button will generate space for entering more points if required.
To replace the standard map with a saved map:
- On the Setup Exam page select the Mark-Grade Map tab.
- Scroll down to the Replace Mark Map section
- From the drop down list select the required map
- Select the Replace Map button.
Previous: 2. Creating and accessing the Exam tool or Next: 4. Entering Exam Marks
